Using WS-AppServer Business Logic in XForms |
|
Before you begin this task:
Ensure that the Cordys XForms Runtime and Cordys WS-AppServer application packages are installed.
Using the Cordys WS-AppServer, you can auto-generate and extend the required business logic for web applications. Additionally, Process Platform supports the integration of WS-AppServer with XForms such that, based on the conditions specified in it, the business logic can be directly executed on data in an XForm.
You can integrate the WS-AppServer business logic with an XForm to achieve any of the following:
- Define the Enable, Disable, Hide, and Show access modes and use them for controls.
- Enable the auto-initialization of new data inserted in an XForm.
- Specify validation constraints to validate changes made to data.
- Enable the automatic pre-filling of Select controls with data based on the business logic.
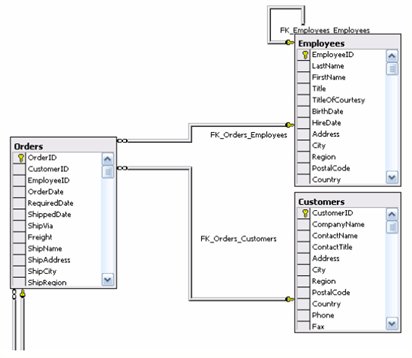
Consider the possible relationships between the Orders table and the Employees and Customers tables of the Northwind database (MS-SQL Server). The following figure depicts the schematic representation of the tables and their relationships.
- Configure the WS-AppServer service container to point to the appropriate database (in this case, the Northwind database). See WS-AppServer service container configuration, for details. Also, ensure that the related packages, Java Classes, and Web service interfaces exist or are created for the Orders table.
- Create the XForm. From the Insert tab of the XForms Designer, drag the appropriate Web service operation (in this case, GetOrdersObject) to the XForm to generate the default user interface. Alternately, you can right-click in the Designer Area and select Insert > Web Service to view available Web services and add the required Web service to the XForm.
- Enable WS-AppServer integration with XForms in order to access and utilize the features offered by the integration.
- Write business logic on the extended Java class (in this case, Orders.java).
- Define access modes. In this case, access modes with the following logic need to be created for fields in the Orders table.
Field
Description of logic used
OrderID
* Hide OrderID for new orders
* Disable OrderId for existing ordersFreight
* Hide Freight field if its value is less than ten.
* Show Freight for new orders.To achieve this functionality, the necessary supporting packages need to be imported as follows:
import com.cordys.cpc.bsf.event.AccessMode;
import com.cordys.cpc.bsf.event.AttributeAccessEvent;
The java code for the OrderIDfield is as follows:
public void onDisplay_OrderID(AttributeAccessEvent context)
{
  if(isNewObject())
  {
    context.setAccess(AccessMode.HIDE);
  }
  else
  {
    context.setAccess(AccessMode.READONLY);
  }
}
In this case,
- the OnDisplay keyword is used to specify and set the access modes.
- the context event object applies the logic to the current order.
the isNewObject()Web service operation is used to indicate if the current order object is new or if it already exists.
private boolean isNewObject()
{
  //an Order object is new if its OrderID is 0
  return this.getOrderID() == 0;
}
Similarly, the java code for the Freightfield is as follows:
public void onDisplay_Freight(AttributeAccessEvent context)
{
  //hide the field for existing objects, where Freight < 10
  if(! isNewObject() && this.getFreight() < 10)
  {
    context.setAccess(AccessMode.HIDE);
  }
  //else: default is ReadWrite
}
Note:
To be able to execute this, ensure that the Apply Access Control check box in the WS-AppServer tab of the Model Properties dialog box of the XForm is selected.
- Enable the auto-initialization of new data. In this case, say the following auto-initialization needs to be defined.
Field
Description
OrderDate
Present date; to be specified in case of a new order
RequiredDate
The date one week later than the order date of a new order.
To achieve this, the following packages need to be added:
import com.cordys.cpc.bsf.event.AttributeInitializeEvent;
import com.cordys.cpc.bsf.util.DataConverter;
import java.util.Date;
The code to auto-initialize data is as follows:
public void onInitialize_OrderDate(AttributeInitializeEvent context)
{
  context.setInitialValue(DataConverter.Date2String(new Date()));
}
public void onInitialize_RequiredDate(AttributeInitializeEvent context)
{
  //calculate the date for today+1 week
  Date today = new Date();
  long oneWeekMSec = 7*24*3600*1000;
  Date plusOneWeek = new Date(today.getTime() + oneWeekMSec);
  //the initial value is passed via the context
  context.setInitialValue(DataConverter.Date2String(plusOneWeek));
}
Note:
To be able to auto-initialize data when new orders are added, ensure that the Initialization Required*checkbox in the *WS-AppServer tab of the Model Properties dialog box of the XForm is selected. - Specify validation constraints. In this case, the following validation constraints are required.
Field
Description of Validation Constraint
CustomerID
Mandatory; should always be present in the Customers table.
OrderDate
Cannot specify a past date, earlier than the present date.
To achieve this, the following package need to be added:
import com.cordys.cpc.bsf.event.AttributeConstraintEvent;
import java.util.Calendar;
The code to set the specific constraints is as follows:
public void onConstraint_CustomerID(AttributeConstraintEvent context)
{
  //check the available Customers whether the Customer exists
  //the new CustomerID is passed via the context
  String customerID = (String)context.getValue();
  if (Customers.getCustomersObject(customerID) == null)
  {
    context.addError(this, ATTR_CustomerID, "Customer " + customerID + " does not exist !!!");
  }
}
public void onConstraint_OrderDate(AttributeConstraintEvent context)
{
  Date objectDate = this.getOrderDate();
  if(objectDate != null)
  {
    Calendar today = Calendar.getInstance();
    today.clear(Calendar.HOUR);
    today.clear(Calendar.MINUTE);
    today.clear(Calendar.SECOND);
    today.clear(Calendar.MILLISECOND);
    Calendar currentDate = Calendar.getInstance();
    currentDate.setTime(objectDate);
    currentDate.clear(Calendar.HOUR);
    currentDate.clear(Calendar.MINUTE);
    currentDate.clear(Calendar.SECOND);
    currentDate.clear(Calendar.MILLISECOND);
    if (this.isPersistentNew() && currentDate.compareTo(today) < 0)
    {
      context.addError(this, ATTR_OrderDate, "Date cannot be less than today!");
    }
  }
}
In the above code, we check if CustomerID already exists in the Customers table. After all related table classes are created by the WS-AppServer (by default), the getCustomersObject()Web service operation is used to retrieve the customer ID.
Note:
- To enable the constraint validations, ensure that the Constraint Validation checkbox in the WS-AppServer tab of the Model Properties dialog box of the XForm is selected.
- Also, ensure that the property is enabled for each control for which the constraints need to be evaluated. So, the Constraint Validation On Change check box needs to be checked in the CustomerID and OrderDate property sheets.
- Enable the automatic pre-filling of the Select control. You can pass multiple data values from a database to a Select control that display as options in the control. This ensures that only the possible, valid values are displayed at run time, which can be selected from the drop-down list of the Select control.
In this case, the values from the database need to be pre-filled in the EmployeeIDfield:Field
Validation
Description
EmployeeID
Choice Values
Employee name will comprise the FirstName and LastName of the employee.
To achieve this, the following packages need to be added:
import com.cordys.cpc.bsf.event.AttributeValuesEvent;
import com.cordys.cpc.bsf.busobject.BusObjectIterator;
The following code is used to iterate through employee records, combine the first and last names for each record, and add it to the event object that is rendered in the XForm.
public void onValues_EmployeeID(AttributeValuesEvent context)
{
  //Get all Employees
  BusObjectIterator<Employees> iter = Employees.getEmployeesObjects(0, 999);
  while (iter.hasMoreElements())
  {
    Employees c = (Employees)iter.nextElement();
    //filter out the valid ones
    String value = ""+c.getEmployeeID();
    String label = c.getFirstName() + " " + c.getLastName();
    //add value to the context
    context.addValue(value, label);
  }
}
You can also use a Select control instead of the default EmployeeID input control that is generated on the Orders table of an XForm. Here, instead of setting a Dataset for the Select control, the Initialize Value Sets WS-AppServer property must be set to Once or Always.
Note:
Steps 4, 5, 6, and 7 are optional and can be used to achieve specific requirements.